Who doesn't LOVE the combination of chocolate and coffee.. and then you add in a kick of Bailey's Irish Cream... these flavors are like a party in your mouth! When we were told to make Pavlovas for Custard & Meringue week, I was SO EXCITED because pavlovas are actually one of my desserts of choice! It's such a wonderful dessert that is not so hard to make AND very impressive for guests to eat. I also feel like pavlovas have some magical way of making you feel lighter after a heavy meal. That means you lose calories by eating more, right? ;)
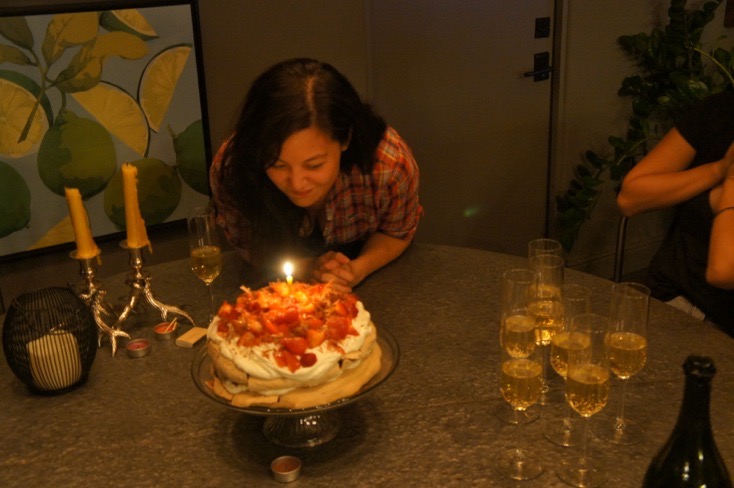
My 30th birthday pavlova cake :)
I few years back, I was lucky enough to be apart of a group of friends that wanted to attempt a pop-up restaurant concept. For that opportunity, I came up with a recipe for mini-pavlovas using a chocolate base with coffee. Because it was an Irish theme'd menu, I naturally incorporated Bailey's Whipped Cream and then topped with raspberries.
You can have free range for decorating these little guys however you wish. The simplest is a dusting of chocolate shavings. If you want to be ambitious and have the time, temper dark chocolate and create some beautiful toppers. On the show, I made chocolate rolls and placed them between cut raspberries.
Dark Chocolate Coffee Pavlova, Bailey’s Whipped Cream, Fresh Raspberries
Makes about 20 x 2 ½" mini pavlovas
Pavlova Ingredients:
- 6 large egg whites, room temp
- 300 grams granulated sugar
- 2 tablespoon + 1 teaspoon, Valrhona cocoa powder
- 1 tablespoon good aged balsamic vinegar
- 50 grams good quality chocolate (70%) chopped into small pieces
- 2 teaspoons good quality coffee grinds (not instant)
Topping:
- 2 punnet of fresh organic raspberries
- 500 ml whipping cream
- 1 tablespoon granulated sugar
- 2 tablespoons Bailey's Original Irish Cream Liquor
- pinch of kosher salt
Dark Chocolate Decorations:
- 4 ounces of dark chocolate 70%·
1. Preheat oven to 355 F / 180 C. On a piece of parchment paper, trace 2.5 inch circles spaced at least 2 inches apart with a pencil. Should be able to fit 9 of them comfortably on each baking sheet.
2. Chop dark chocolate into small pieces and set aside. Note: If you are using a piping tip for the meringue, do not use a narrow tip and make sure to chop the chocolate up in small enough pieces to push through it!
3. Place egg whites in a stand mixer bowl with a whisk attachment. Whisk until soft peaks form. Slowly add caster sugar one tablespoon at a time and continue to beat until the egg whites become stiff and glossy. Don’t over beat the egg whites or they will separate. When you can hold the mixture upside down without it falling out it’s done.
4. Sift in cocoa powder, add balsamic vinegar, chopped chocolate and coffee. Using a large spoon spatula, mix very slowly and carefully by folding the mixture and egg whites. The mixture will be a light brown shade. Don’t over mix or you will deflate the egg whites.
5. Using a little pavlova mixture, apply on the corners of the parchment paper (same side you drew on) then flip over parchment paper so it’s pencil side down on a baking sheet.
6. Add meringue mixture to a piping bag and pipe into the circles and clean it up with an offset spatula. Make sure you are FILLING them completely when swirling.
7. Place into oven then immediate drop the temperature to 284 F. Cook for 1hr to 1hr 15 minutes. Do not check on the pavlovas until the very end of the bake time.
8. The way to tell when pavlovas are done cooking is when it looks crisp at the edges. They also may slightly brown. The tops will be dry but if you press on the underside it’ll give a little since the centers are still soft and squishy. If you tap them lightly they should also sound a little hollow. If they still feel a bit soft then put them back into the oven for another minute or two.
9. If the pavlovas are crisp, place them back in the oven and leave the door slightly ajar so the pavlovas can cool completely in the oven. Should take another 35 minutes or so. Do NOT remove the pavlovas from the oven before they have finished cooling or they will crack.
10. In the meantime, place whipping cream in a CHILLED stand mixer bowl fitted with a whisk attachment. Start to whisk and when some peaks appear, add sugar slowly. Then add in Bailey’s after sugar. Keep whisking till firm but don’t over whip.
11. Take whipped cream and place into a bowl fitted with plastic wrap and into the fridge until using. Eventually will be piped on each pavlova.
12. Place whipped cream into piping bag and pipe onto pavlova. Then top with two to three raspberries cut side up to ensure juice doesn’t bleed into cream. Garnish with dark chocolate decorations or shavings.
Pavlovas from The Great American Baking Show